Showing posts with label Bread. Show all posts

Tuesday, January 18, 2011

I love a tasty way to sneak in an extra veggie!

When I made Rice Balls ala Tim the other night, I knew I wanted garlic bread too. Looking at my meal for the night- I felt it needed a veggie bump!! I had purchased a bag of fresh spinach on my last trip to the store, so I started my search for recipes. The perfect combo...Rachael Ray's Green Gobble'ems!


I made a half batch of the spread, because all the reviews said it made a ton!! You need: Fresh Spinach, Parmesan Cheese, Garlic, Butter, salt and pepper.

Put two cups of the spinach, two cloves of garlic, half a stick of softened butter, 1/2 cup of Parmesan Cheese, salt and pepper in a food processor or mini Chopster and pulse until creamed.

Split a loaf of French Bread and spread liberally with the spinach mixture. I chose to top mine with a little shredded mozzarella cheese :)

I baked mine about 7 minutes and then under the broiler for 1 minute to brown the cheese.

And it was wonderful! A lot like pesto and a great way to add a veggie to your meal. I could eat a loaf of this as my meal!!  I think it would be great with hot pasta as well.


Sunday, December 12, 2010

Yum...I really LOVE Cream Cheese Frosting!

To go along with my need to bake with yeast this weekend, I decided to try a new Cinnamon Roll recipe as well. I've recently discovered how much I love making dough and then allowing it to rise in the refrigerator overnight. I still can't believe that actually works! This time, I used the recipe for Overnight Cinnamon Rolls.


Again, proof 2 1/4 tsp of yeast with 1/2 cup of white sugar in 1 cup of warm milk. Add 1 cup of flour, 1/3 cup melted butter, 3 eggs and 1 tsp of salt. Continue adding flour and knead dough until smooth. Place in an oiled bowl, covered, for 1 hour.

After 1 hour, roll dough into a large rectangle, about 10 x 14. In a bowl mix 3/4 cup of Brown Sugar with 1 TBS of cinnamon.

Spread evenly over the dough leaving 1 edge clean. Brush this edge with water.


Slowly roll the dough and seal the edge. Cut into 12 equal pieces.

Place into a buttered baking dish. I used 2 8x8 pans so I could freeze one batch for another time. Cover with plastic wrap and refrigerate overnight.


 Look how big they got overnight!!! Allow to sit at room temp for 30 minutes. Pre-heat oven to 375 degrees.


While the cinnamon rolls bake- make frosting :) I didn't use the frosting recipe recommended, instead, I used the frosting from the Clone of a Cinnabon recipe!

My rolls baked for exactly 25 minutes- they got so big!!!


Frost and serve! Very sweet and very delicious :)

Monday, November 15, 2010

I don't just love garlic bread, I adore it!

I love garlic bread, no matter how you serve it...and I love find new ways to serve it even more!! I read a few different recipes and decided to go with the parts I liked from each of them. Success!!


In a bowl, mix 1/2 stick of softened butter, 2 TBS of mayo (I use light), 1/4 fresh grated parmesan cheese, and 1/4 cup each of shredded mozzarella and cheddar. Add in a pinch of dried basil and  1/2 tsp of garlic powder. Mix until well blended.

Spread on a loaf of french bread, coating both sides evenly.

Bake at 400 degrees for 10-12 minutes...or until cheese starts to bubble.

Serve hot- oh so good....if only it were good for you!

Friday, August 6, 2010

Robyn's CRAZY love for chocolate :)

Last week, my mom brought me two homegrown zucchini from my Dad's Christmas Tree Farm. I've made Zucchini Grinders a lot lately, so I decided to make something sweet. I knew my husband wouldn't eat plain old zucchini bread...but with chocolate, he might actually enjoy it!


I followed a recipe for Chocolate Zucchini Bread. It called for eggs, unsweetened chocolate, chocolate chips, baking soda, cinnamon, sugar, vanilla, salt and vegetable oil. I had everything I needed on hand!


Start by grating your zucchini. You could also do this in the food processor. DO NOT drain the excess moisture from the zucchini.


I used two heaping cups of shredded zucchini, which was about 1 1/2 medium sized zucchini. Bag any leftovers for stir fry or freeze in a Ziploc for use in another recipe.


Melt two squares of chocolate in a microwaveable glass bowl for about 1 minute, or until melted and smooth.


Add in everything but the flour and zucchini and stir well to combine.


Add in flour and chocolate chips (I used mini chips) and blend well.


Portion into loaf pans...I used 5 mini pans and still had enough left over to make 8 mini muffins. It took about 20 minutes for the mini muffins to cook and about 40 minutes for the mini loaves....at 350 degrees.
This is what happens if you try to remove the bread from the pan before it has cooled :(  And I forgot to take a picture of the finished product!!! Robyn ate 5 mini muffins plus half a loaf for breakfast yesterday! She calls it..."My yummy chocolate cake". Just don't tell her it has vegetables in it :)


Wednesday, July 21, 2010

Yum- I just love Bruschetta!

I've been craving Bruschetta lately...with my basil in full bloom and fresh tomatoes finally available! I decided to go all out and make my own bread too!

I made French Bread...which only contains Yeast, All Purpose Flour, Salt and Water.

You begin by mixing 5 tsp of yeast with 2 cups of flour and 2 cups of warm water. Mix until smooth.

Continue adding flour until you can no longer mix it in. Dump onto a clean surface and continue kneading until you have added as much flour as necessary. Mine took 5 cups.

Once your dough forms a smooth and elastic ball, place in an oiled bowl, and allow to double in size. This took about 40 minutes.

Robyn was helping- she had flour everywhere! She is trying to brush it off her cheeks :)

After 40 minutes- dump the dough onto a floured surface and degas.

Divide into 2 portions and allow to rest for 10 minutes.

With a rolling pin (a wine bottle would work in a pinch!), roll the dough into a semi-rectangle.

On the long edge, begin folding over the dough rolling into a log. Seal the bottom seam with water and tuck the ends under.

Brush with an egg white beaten with a little water. I covered mine with plastic wrap that I sprayed with cooking spray. Allow to double in size- approx 30-40 minutes.

Cut slices in the top of your bread before baking. Place in 375 degree oven for 20 minutes.

After 20 minutes, brush again with the egg white mixture. I put the loaves back in the oven and threw 5 ice cubes in the bottom to create some steam!

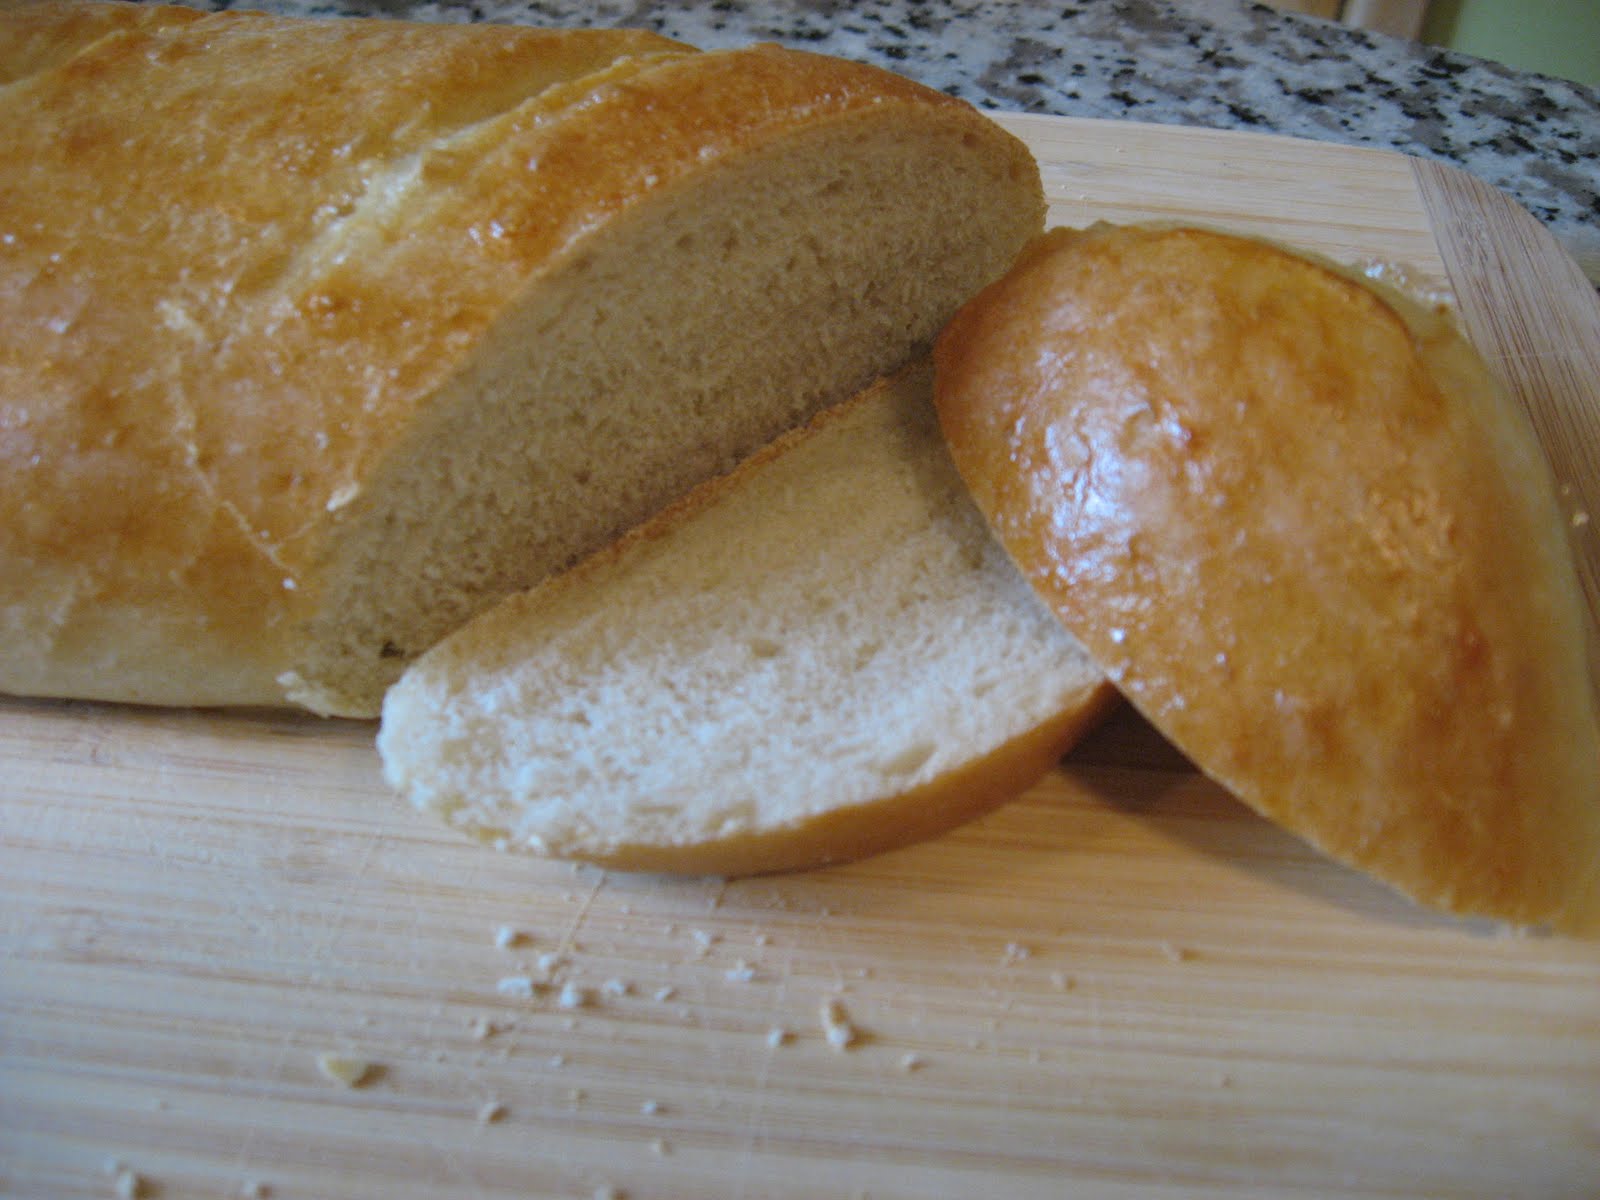
After baking for another 15-20 minutes, the loaves were done!

Chewy inside with a beautiful, golden crust!

Usually, when I make Bruschetta I just start throwing in what I like. This time, I used a recipe that intrigued me (Bruschetta I). It called for fresh basil, chives and parsley...all of which are growing in my garden.

I chopped about 20 grape tomatoes and used my micro plane to grate one gigantic clove of garlic.

The micro plane makes the garlic super fine...so you don't bite into chunks of raw garlic.

Bundle all your herbs into a tight pile. This makes them much easier to chop.

Chop until fine and no large leaves remain. Add to tomato and garlic.

Dress with olive oil, salt and pepper. Refrigerate until ready to serve.

Slice bread into thin pieces and place on a cookie sheet. Spray with cooking spray or olive oil and sprinkle with garlic salt. Bake in a 400 degree oven for about 10 minutes...until crisp.

Top with Bruschetta and enjoy! I love this for lunch or dinner in the summer :)

Friday, May 28, 2010

I love spending money for other people!!!

My parents recently vacationed in Florida. While there, they fell in love with Lobster Rolls. Upon returning home, my dad searched for how to make New England Style Hot Dog Buns- you can't buy them in Iowa! He encountered the King Arthur website and ordered a pan. He then gave me the pan to keep, with the condition I make him the rolls. I think I got the good end of this deal :)

Last weekend was my mom's birthday. My dad called me a few days before I was to head home and asked if I would make Lobster Rolls for her birthday dinner. Lobster isn't in my budget, but it was fun to buy it with his money :) The guy behind the seafood counter knows what I usually buy, and when I told him I wanted 5 Lobster Tails- his eyes got huge!
Now, on to the food! For the bread I used the Hamburger or Hot Dog Bun recipe from King Arthur. It came with the pan and provided instructions on how to use my new pan. I proofed the yeast in water and sugar.


Then you add in the milk, oil, salt and part of the flour. You beat it with a wooden spoon for two minutes.


After working in the rest of the flour and kneading, I set the dough aside to rise. I was busy, so instead of getting a clean kitchen towel to put on top, I got the bright idea to use a damp paper towel. It stuck to the dough and was so hard to pull off! I wouldn't recommend it :)


I split the dough into two portions. The first I rolled with a rolling pin in a rectangle to fit my pan, the other half was made into hamburger buns. I sprayed the pan with cooking spray and placed the dough in it to rise.


The strange part of this recipe is the use of a sheet pan placed on top of the loaf pan. You place it on the pan while the dough rises - you want to let it rise until it reaches the top of the pan. You bake the buns with the sheet pan on top for the first 15 minutes. DON'T weigh down the sheet pan! (And please don't look at my dirty oven!!)


You allow the buns for an additional 5 minutes to brown the top. I brushed them with butter when they came out of the oven and removed them from the pan immediately. This is to prevent them from getting soggy bottoms.


This is what the underside looks like. It's your guide for where to separate the buns.


The taste of the rolls was good...but more comparable to a Ciabatta then a hot dog bun. I was disappointed with the size. This pan makes SUPER skinny and short buns. I won't use it for regular hot dog or brat buns, but it was a fun experience!

Now, on to the gorgeous LOBSTER!


I cooked these in the oven- first I split the underside of the shells with kitchen shears. This makes it much easier to remove the meat after they are cooked.


I brushed them with butter and placed on a foil lined baking sheet. I baked them at 400 degrees for roughly 20 minutes. I used a thermometer to cook them to an internal temp of 180 degrees. Set aside and allow to cool.


I then mixed up the "dressing" for the lobster salad. Combine mayo, hot sauce, lemon juice, green onions, celery and a little chopped parsley. I used this Lobster Roll recipe- http://allrecipes.com/Recipe/Lobster-Rolls/Detail.aspx


Stir together the ingredients and set aside while you chop the lobster.


GORGEOUS!!! I may have been sneaking small bites while I removed the shells :)


A big bowl of perfectly cooked Lobster Tails! Chop into bite size pieces, add to the dressing mixture and refrigerate until serving.


Butter up both sides of the buns and toast until golden.


Split the rolls down the top, fill and serve with your favorite sides. It was a fantastic summer meal- and a fun project for my mom's birthday!


If anyone else has money they would like me to spend for them- I'm always available!! Have a great holiday weekend.