Saturday, June 26, 2010

I love Hummus!

Robyn and I took a trip back to my parents this week to pick blueberries at my Dad's Christmas Tree Farm. Our second night there, I made dinner. We were looking for something light and healthy...so we went Greek!

For starters, we had my personal recipe for Hummus with toasted Pita chips.


Hummus is so simple...just throw everything into the blender or food processor, and puree until smooth. Refrigerate until ready to serve.


I used store bought pitas and cut them into small wedges.


Place pitas on a baking sheet, spray with cooking spray and season with garlic salt and lemon pepper. Bake at 400 degrees for 8-12 minutes, depending on how crisp you like them. I usually flip them once while they bake.


Serve and enjoy- also wonderful in a pita pocket with fresh veggies. Carrots and celery make great dippers as well.


For dinner, I made a giant Greek Salad. I used the recipe for Absolutely Fabulous Greek/House Dressing. I scaled it back to 8 servings and had to use White Wine Vinegar, because we didn't have any red.

Measure and whisk together- so simple and very tasty!


For the salad I used Romaine lettuce, Kalamata Olives, Red Bell Pepper, Cucumber, Red Onion and Tomatoes. This was supposed to have Feta Cheese on it, but the Tornado sirens went off in the middle of preparing it, and I completely forgot! It was still good without it.


Served the salad with grilled chicken for a light and delicious summer meal.

Thursday, June 24, 2010

Made with love for Papa!

When I asked my husband what he wanted for breakfast on Father's Day, his reply was "biscuits". Easy enough, I thought. I'll go buy a can in the morning- what a simple breakfast. I woke up the next morning while hubby was sleeping in. And then I thought, I make lots of breads, why not try biscuits? After searching for a recipe, I decided on Never Fail Biscuits...the title was promising and I had everything on hand.


Funny- I actually received a pastry cutter as a shower gift when we got married...almost 5 years ago! This was the first time I used it :) I mixed the dry ingredients and cut in the butter until the mixture resembled oatmeal.


I rolled out my dough and got to use another new toy! I recently purchased my first set of biscuit cutters to make the Hamburger cakes for Father's day. I can't wait to use them to make homemade hamburger buns in a uniform size!


I was able to get 12 biscuits from this recipe. I placed mine on a silpat and brushed with a little milk. Baked at 450 degrees for about 10 minutes.


I was a little nervous when they came out of the oven. I thought they were going to be like rocks...but I was wrong! Flaky and light!


Papa's card and wrapped gift- wrapping paper was made by Robyn!


I had my biscuit with a bowl of fresh berries...


My husband had his biscuits with lots of butter! A fun experiment, and I must say, I won't buy the canned biscuits ever again!!

Monday, June 21, 2010

I love playing with my food :)

For Father's Day, I was looking for a fun dessert to make. I haven't been baking many desserts lately, so I really wanted to play! I decided on Fast Food Burgers featured on Bakerella. They were so easy and super cute! I didn't make the fries because I didn't need tons of dessert in my house for days...just a cute treat!

The instructions used all box mixes, so I did too :)


I baked up the cupcakes and brownies and let them cool. I made 18 regular sized cupcakes and 18 mini cupcakes from one mix. I did end up needing two cans of frosting. I also tinted and bagged red, yellow and green frosting. I just used ziploc bags and snipped the tip off one end.


For the mini cupcakes, I piped on plain white frosting and decorated with 4th of July Sprinkles. A fun trick- if you want a fancier look and you are using a ziploc bag without a tip, you can use Pinking Sheers to snip the corner. It looks like you used a star tip when you pipe!


The finished mini cupcakes. Mini food is so dangerous!!!


For each burger, I cut a regular sized cupcake in half.


I used my biscuit cutter to cut out the brownies. I got 14 burgers from a 9x13 pan of brownies.


Place your brownie burger on the bottom half of the "bun" and top with ketchup and mustard.


Finish by piping on the green lettuce, and replacing the top of the cupcake on each burger.


I dipped my finger in water and lightly moistened the top of each cupcake, then topped with sesame seeds.


The end result- ADORABLE and very tasty too :) Not as intimidating as I first thought, and very impressive looking. Would be so fun for a summer block party or back yard BBQ.

Saturday, June 19, 2010

I love having such a handy Dad!

I don't live in the same town as my parents, but they visit lots because they don't live far. Every time my parents come, I look for a fun recipe to make. This weekend, in honor of Father's Day- I wanted a "manly" meal. I decided on Philly Cheese Steak Sandwiches on homemade Deli Style Rolls.
My dad is great! He is super handy and very accomplished. In the span of his career, he became President of a large bank in my home town and later went on to start his own bank. He also has his own Christmas tree farm (interesting combo, I know!) where out family spends a lot of time together through the holiday season. He can also build just about anything I need out of wood! He made a beautiful set of cabinets in my kitchen with frosted glass doors and recently built a new deck on the side of my house. It's wonderful and has such a beautiful design! I can hardly remember a time he has come to visit and hasn't fixed something :) It's great to have a handy dad. He's pretty great in the advice department too- and never judges our decisions, good or bad!

Now- on to the food! I couldn't make this wonderful sandwich without making my own rolls first. I used What's For Dinner Mom's Deli Style Sandwich Rolls. A great crust with a very soft center!


This recipe calls for yeast, bread flour, vital wheat gluten, water, oil, sugar, salt and malt powder. I was unable to find the malt powder I needed for this- so I left it out. The buns were still wonderful!

Since I was not using a bread machine, I began by proofing my yeast in 1/2 cup of warm water with 1 TBS of the sugar. I added in the flour, water, remaining sugar, salt, vital wheat gluten and oil. I ended up using just shy of 6 cups of bread flour. I kneaded the dough until it formed a soft ball and placed in an oiled bowl to rise.


I allowed the dough to rise for about 1 hour...and it got HUGE! I then shaped into hoagie style rolls and allowed to rise for another 30 minutes.


Before baking, I brushed my rolls with a little milk. I baked them at 400 degrees for about 30 minutes.


Golden brown with a beautiful crust! I got 12 hoagie rolls out of this recipe. I still need to work on shaping these for next time :)


Then I cut up 2 green bell peppers and 1 Vidalia onion.


I also used 1 1/2 pounds of round steak cut into sandwich slices. I actually pounded these out a bit more and cut into smaller strips to fit my sandwich better.


I browned my steak while the veggies cooked.


I don't think there is anything that tops the smell of fresh baked bread combined with peppers and onions as they cook!


The finished product, served with melted provolone cheese and corn on the cob. It was a delicious Saturday lunch- which was even better, because I shared it with my dad.


Happy Father's Day Dad!!!!

Monday, June 14, 2010

My love for Sage!

This is the very first recipe I ever submitted to Allrecipes- and it is still one of my favorite things to make. There is nothing complicated about my Sage Brown Butter Ravioli, but it looks impressive and the flavor is so rich! Beware- this is NOT diet food :) I start by picking fresh sage from my garden, drying and cutting into a chiffonade. I use about 20 large sage leaves, or roughly 1/2 cup after chopping.

The only other ingredients are cheese ravioli, gray salt and butter!


Robyn has to wear her apron whenever I wear mine, even if she isn't helping :)

Bring water to a boil and add ravioli. In a large skillet, melt 6 TBS of butter over medium heat.

When butter is fully melted, add the sage and turn the heat to high.

Stir the butter until it foams. As the foam subsides, the butter will turn brown. It is done now- remove from heat and add the salt.

Your ravioli should be done at the same time! Drain and add to the skillet.


Toss to coat all pasta evenly and serve.


We like ours served with a little fresh grated Parmesan cheese on top. Nutty, earthy, simple and delicious!

I love a good salad for dinner!

My husband says he could eat Caesar Salad for dinner every night during the summer. I love to make my own dressing, and it does not contain raw egg. For the recipe, see my Sensational Caesar Dressing recipe. First step- gather your ingredients!
Throw everything into your blender or food processor and blend until smooth. I grate my garlic in using a microplane, so you don't end up with any "chunks" of garlic. I also stream in the olive oil last. Cover and refrigerate until you are ready to use.
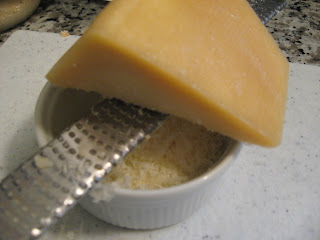
In my opinion, if you are going to make a salad for dinner, make it special. I love to make Parmesan crisps to garnish the salad. Grate 1/4 cup of fresh Parmesan cheese per person.

Arrange in a small pile on a silpat or parchment paper.


I also make my own croutons, from homemade bread, of course!!

Cut bread into bite sized cubes and spray with Olive Oil cooking spray. I flavor mine with a little garlic powder and fresh black pepper.

Throw both in the oven at 400 degrees. The Parmesan crisps take less than 5 minutes, so keep peeking on them. The croutons take about 12 minutes, tossing once. In another bowl, add fresh Romaine lettuce and 1 TBS of dressing per person. This is really thick dressing, so it is best to toss the lettuce with it before plating.
I also use 1 grilled or broiled chicken breast, cubed and distributed over two salads.


This is what the Parmesan crisps look like when they are done!


And the yummy, crunchy, croutons!


Arrange lettuce on the plate and top with chicken and croutons. Place Parmesan crisp on top and enjoy!